The main purpose of the lab is to learn the processes for two new algorithms for performing advanced classification. The lab will have me performing an expert system/decision tree classification utilizing provided ancillary data and then I will use an artificial neural network to perform complex image classification. Throughout the following blog I will summarize the methods I used to complete the classification for both methods and display the results.
Methods
Expert System Classification
All of the methods for this section were performed in Erdas Imagine 2015.
Expert system classification is one of a limited number of classifiers which can produce results above the required accuracy requirements. The expert system utilizes ancillary data such as zoning data or Census (population) data to assist in classifying a remotely sensed image.
I was provided an image from my professor of the Eau Claire and Chippewa Falls area in Wisconsin (Fig 1). The image has a few accuracy errors when analyzing the original classification which was performed. Certain green vegetation areas along with certain agricultural areas and a few other features have been classified incorrectly. In the following steps I will be utilizing the expert system classification method to improve the accuracy of the original classification.
 |
| (Fig. 1) Orginal classified image provided to me by my professor of the Eau Claire and Chippewa Falls area. |
The first step is to develop a knowledge base by which to improve the original classified image. To accomplish this I opened the Knowledge Engineer interface from the Raster sub-menu. From the Knowledge Engineer interface I created hypothesis & rule to classify each class for the image. The first rule I created was for water (Fig. 2). I then created a rule for the remaining classes.
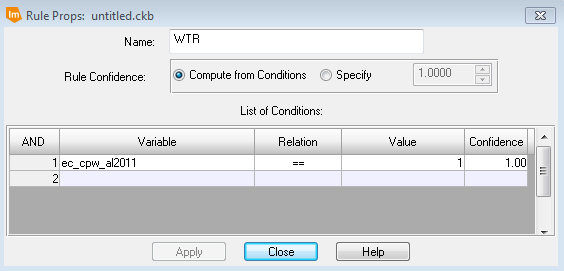 |
| (Fig. 2) Rule Props window creating the rule for the water class. |
The second step is to add the ancillary data in to the rules to assist in the classification. The first new hypothesis I created was labeled Other urban. In the Rule Props window inserted the variable provided to me by my professor which will assist the algorithm select out the "other urban" areas (Fig. 3). Then a second variable was inserted to classify the areas with the proper label in the image. The second step is to make a counter argument for the original Residential classification to exclude the residential area from being classified in to the "other urban" area (Fig. 4). I then utilized the same process to use ancillary data to convert green vegetation which was wrongly classified as agriculture and a separate hypothesis for the opposite. After completing the previous tasks the decision tree was complete and ready to perform the classification (Fig. 5).
 |
| (Fig. 3) Creation of the Other Urban area rule with tree display. |
 |
| (Fig. 4) Creation of exclusion rule for the original Residential class. |
 |
| (Fig. 5) Knowledge Engineer window with the decision tree completed. |
Opening the Knowledge Classifier from the Knowledge Engineer menu opened the Knowledge Classification window after opening the above knowledge file in the first window (Fig. 6). Selecting next will then open up a new window to declare your output file name and parameters (Fig. 7). The cell size was set to 30 by 30 per the instructions of my professor. The last step was to run the classification by selecting OK.
 |
| (Fig. 6) Knowledge Classification window with specified classes selected. |
 |
| (Fig. 7) Knowledge Classification window with output file set. |
All of the step unless noted for this section were performed in ENVI 4.6.1.
I opened the image provided to me from my professor and displayed as 4,3,2 band combination in the viewer. I then imported an ROI file containing training samples previously collected by my professor (Fig. 8).
 |
| (Fig. 8) Original image with ROI locations overlayed in the ENVI viewer. |
I then selected Neural Net from the Supervised sub-meun of Classification to open the Classification Input File window (Fig 9************). From this window I selected the image and clicked OK to proceed to the Neural Net Parameters window. I set the parameters according to my professors guidelines/specification (Fig. 10***********). I then ran the classification and opened the results in new viewer (Fig.11).
 |
| (Fig. 11) Results from the Neural Network classification in ENVI. |
An optional portion of the lab was to create my own training samples and classifiy a QuickBird image of the University of Norther Iowa campus (Fig. 12). I opened the provided image and created my training samples per my instructions. I then proceeded to utilize the same procedure to complete the classification of the image (Fig. 13).
 |
| (Fig. 12) Quickbird image with display of created training samples and parameter windows. |
 |
| (Fig. 13) Results of the classification for the campus image in ENVI. |
Results

Sources
Will you provide a video tutorial of knowledge based image classification?
ReplyDelete